


NOW AVAILABLE on Cloud!!!
Be sure to checkout this and many new features in 1.5 here
Hey hey!
Ever wonder how those handy messages pop up on your phone, whether it's a notification about a great deal or a reminder for an event? Well, it's all thanks to messaging! In this post, we'll dive into the world of messaging, talk about how it works, and explore the cool tools you can use to add messaging to your apps.
What's Messaging, Anyway?
Messaging is all about sending messages directly to a user's device, even when they're not actively using your app. It's super useful for sending updates, reminders, or even just saying hi!
Why Does Messaging Matter?
Messaging is a great way to engage with your users and keep them in the loop. Whether it's a transactional message confirming a purchase or a promotional message about a sale, messaging helps you stay connected.
Challenges of Building a Messaging System
Building a messaging system can be tricky. You have to deal with issues like handling high message volumes, managing user connections, and making sure your messages work across different devices.
Introducing Appwrite 1.5 Messaging
Fear not, because Appwrite is releasing its new Messaging feature. This awesome new addition lets you easily add messaging to your apps within minutes.
How to Integrate Mailgun with Appwrite Messaging:
Here's a quick tutorial on how to integrate Mailgun with Appwrite Messaging
- Sign Up for Mailgun: First, sign up for a Mailgun account if you don't already have one. You'll need your Mailgun API key, domain, and email address. (It says 57 seconds, but full disclosure, I think it took me 58). Mailgun lets you send customized email messages to your users. These emails can be sent immediately or scheduled. You can send emails for purposes like reminders, promotions, announcements, and even custom authentication flows.
- Get Your Mailgun API Key and Domain: Once you're logged in to your Mailgun account, navigate to the "Domains" tab. If you haven't added a domain yet, follow the instructions to add one. Once your domain is added, click on it to view your API key and domain name. Note down your API key and domain name as you'll need them later.

Add Mailgun Provider in Appwrite:
Log in to your Appwrite Console.

Go to the "Messaging" tab in the sidebar.
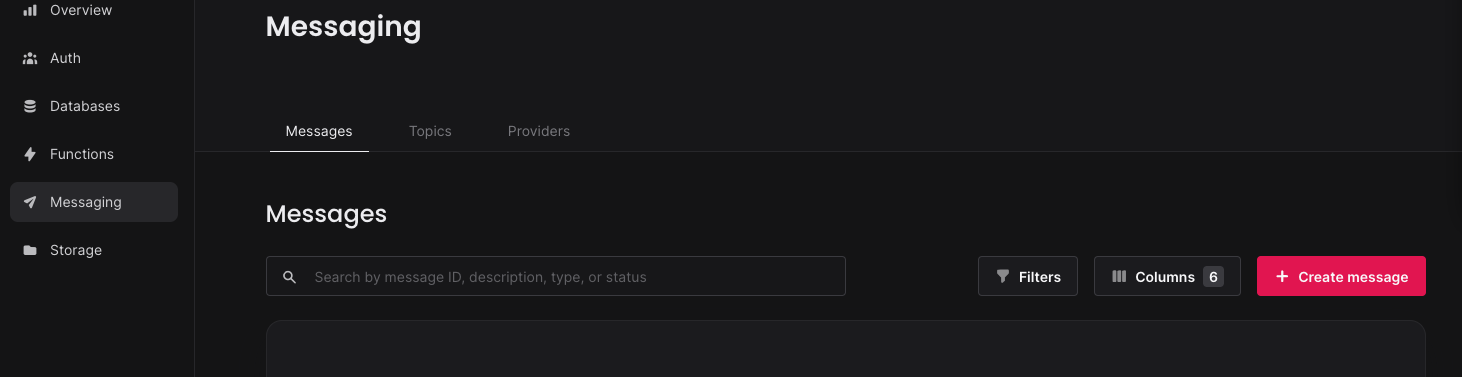
Click on "Create Provider" and select "Mailgun" from the list of providers.
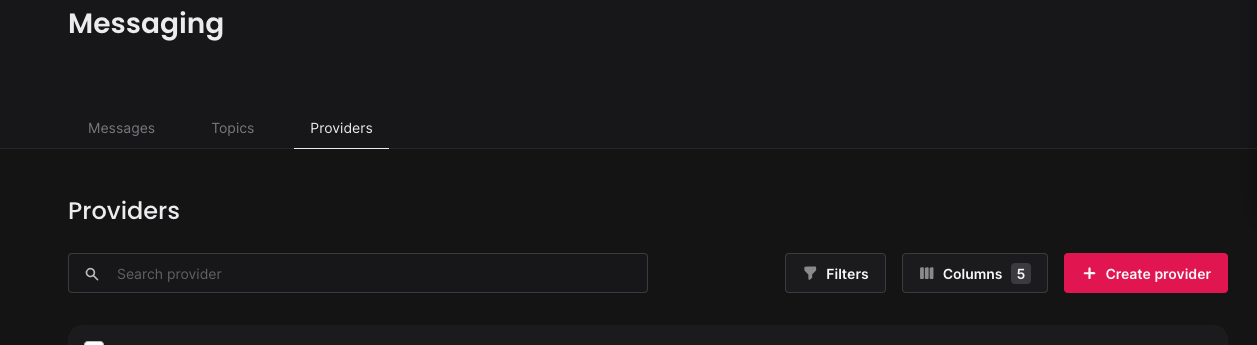
Enter your Mailgun API key, domain name, and the email address you want to use for sending messages. Click "Create" to add the Mailgun provider to Appwrite.The provider will be saved to your project, but not enabled until you complete its configuration.

You will need the following info from Mailgun, enter them into appropriate fields, click Create and continue to enable the provider.
| API key | Head to Profile -> API Security -> Add new key. |
| Domain | Head to Sending -> Domains -> Add new domain. Follow Mailgun's instructions to verify the domain name. |
| EU region | Enable the EU region setting if your domain is within the European Union. |
| Sender email | The provider sends emails from this sender email. The sender email needs to be an email under the configured domain. |
| Sender name | The sender name that appears in the emails sent from this provider. |
| Reply-to email | The reply-to email that appears in the emails sent from this provider. The reply-to email needs to be an email under the configured domain. |
| Reply-to name | The reply-to name that appears in the emails sent from this provider. |
Before sending your first message you will need to configure Topic and Target to send messages to. follow the links to the docs to find out the steps to do so. Very quick and all done in your Appwrite console. You can also implement forms directly in your app to collect data and add it as a Target with createTarget.
const sdk = require('node-appwrite');

const client = new sdk.Client()
    .setEndpoint('https://cloud.appwrite.io/v1')  // Your API Endpoint
    .setProject('5df5acd0d48c2')                  // Your project ID
    .setKey('919c2d18fb5d4...a2ae413da83346ad2');                  // Your secret API key

const users = new sdk.Users(client);

const target = await users.createTarget(
    '<USER_ID>',                     // userId
    '<TARGET_ID>',                   // targetId
    sdk.MessagingProviderType.Email, // providerType
    '<IDENTIFIER>',                  // identifier
    '<PROVIDER_ID>',                 // providerId (optional)
    '<NAME>'                         // name (optional)
);
Sending Messages with Mailgun
Now that you've set up Mailgun in Appwrite, you can start sending messages using Mailgun's email features. Here's how you can do it using the Appwrite API:
Authenticate with Appwrite: Before sending messages, make sure you're authenticated with Appwrite. You can do this by using your project's API key or a user's session ID.
Send a Message:
Use the Appwrite SDK or API to call the messaging service and send a message.
  const sdk = require('node-appwrite');

  // Init SDK
  const client = new sdk.Client();

  const messaging = new sdk.Messaging(client);

  client
      .setEndpoint('https://cloud.appwrite.io/v1') // Your API Endpoint
      .setProject('<PROJECT_ID>') // Your project ID
      .setKey('<API_KEY>') // Your secret API key
  ;

  // update provider
  messaging.updateSendgridProvider(
      '<PROVIDER_ID>',
      '<PROVIDER_NAME>',
      '<API_KEY>',
      '<DOMAIN>',
      '<IS_EU_REGION?>',
      '<SENDER_NAME>',
      '<SENDER_EMAIL>',
      '<REPLY_TO_NAME>',
      '<REPLY_TO_EMAIL>',
      '<ENABLED?>',
  ).then(function (response) {
      console.log(response);
  }, function (error) {
      console.log(error);
  });

  // delete provider
  messaging.deleteProvider('<PROVIDER_ID>')
  .then(function (response) {
      console.log(response);
  }, function (error) {
      console.log(error);
  });
Specify the recipient's email address, the sender's email address (usually your verified Mailgun domain), the message subject, and the message body. In Appwrite Messaging, each user has targets like their email, phone number, and devices with your app installed. You can deliver messages to users through their targets. If the user signed up with email and password, their account would already have email as a target. During development, you can add targets to existing accounts by navigating to Authentication > Users > Select a user > Targets > Add a subscriber.

You can also implement forms in your app to collect contact information and add it as a target with the createTarget endpoint
You can also create topics programmatically using an Appwrite Server SDK.
const sdk = require('node-appwrite');

// Init SDK
const client = new sdk.Client();

const messaging = new sdk.Messaging(client);

client
    .setEndpoint('https://cloud.appwrite.io/v1') // Your API Endpoint
    .setProject('5df5acd0d48c2')                 // Your project ID
    .setKey('919c2d18fb5d4...a2ae413da83346ad2') // Your secret API key
;

const topic = await messaging.createTopic(
        '[TOPIC_ID]',                            // topicId
        '[NAME]'                                 // name
    );
Appwrite will handle the message sending process using Mailgun's API under the hood.
Handle Response: Check the response from the Appwrite API to ensure that the message was sent successfully. Appwrite will provide a response indicating the status of the message delivery.
Monitor Message Status (Optional): You can also monitor the status of your messages using Mailgun's dashboard or API. This allows you to track delivery status, bounces, and other important metrics related to your messages.
And that's it! You've successfully set up Mailgun in Appwrite and sent a message using Mailgun's email features.
Follow me for more mid quality content here and be sure to checkout our livestreams of #GridironSurvivor as our team builds a Survivor Football app using Appwrite! As an #AppwriteHero expect lots more content on my favorite BaaS!
</Fin>